Paint Booth, Collapsible Painting booth V1.0, Pat Spencer's ID:204
 | |
| Type | |
| Make/Model | v1.0 |
| Serial number | N/A |
| Original owner | Donated by Pat Spencer |
| Loan status | Donated |
| Arrival date | ? |
| Location | DMZ Zone |
| Functional status | Under Development to V2.0 |
| Usage permissions | anyone |
| Certification | None |
| Wiki-ID | [[]] |
| Label | 1.0" 1.5" 2.0" |
Backgroup
This Booth was donated by Pat Spencer in response to discussion about a painting project by @David.C
See this Forum Post--> https://forum.protospace.ca/t/now-a-pitch-jank-booth-aka-how-jank-a-paint-booth-could-we-realistically-jank/4684/30
It was offered and used successfully to do the pinball game painting, and is stored in the DMZ area against the wall.

Note that this is a V1.0 (Early prototype) of a small portable Paint booth that servers 2 needs:
- Provides a low dust environment for spray painting
- Send fumes outside
The booth was designed to be set up and taken down using an electric screwdriver, screws, some poly, and a few 2x2's.
It has been suggested that this is too hard to set up and could use a revision to make it more usable.
There are 2 possible versions that may come out of this discussion:
- Make it easier to use as it is currently designed. or
- Redesign for a "use-in-Place" kind of setup that would be even easier to use.
Both of these suggestions have some compromises, so a review and member consensuses is needed.
Setup Instructions:
Step 1:
- Prior to setting up the booth, make sure that there is not going to be a conflict with another pitch for the space. Create a pitch in the Forum to reserve the space for the duration of when you are going to be using the DMZ. Please give at least 24 hours notice to allow for anyone to object.
Step 2:
- Lay down a poly or drop cloth on the floor where the booth will eventually sit. Note: that there is a folded up poly sheet of appropriate size on the top of the fan booth. This should do the job.
Step 3:
- Gently begin to roll the booth over to the poly dropcloth that you have prepared. Note that the booth in it's collapsed form is quite top-heavy and may need to be opened up a bit in order to stabilize it.
- Unlatch BOTH latches, one on each end, and allow it to expand slightly while it is being moved.


- You also may have to help the roof slide up a bit as it expands. The roof is attached at the front and slides down the back as it is collapsed.


- Once it is expanded to nearly it's final size, remove the spreader bar from it's storage above the door and use it to latch the walls apart.


Step 4:
- Collapse the casters to drop the booth to the floor. This is done by gently lifting each corner and kicking out the caster so that the wheel is outside of the booth pointing up. The booth should slide down at the fan unit and the rest on the floor, sealing to your drop-cloth.


- Make any adjustments to endure that the booth is mostly square. This will be evident when the roof part that slides is pretty horizontal.
Step 5:
- Connect the exhaust flex hose to the output of the fan box. Currently the Flex Hose is stored in a box in Pat.Spencer's storage. Shelf B5C.
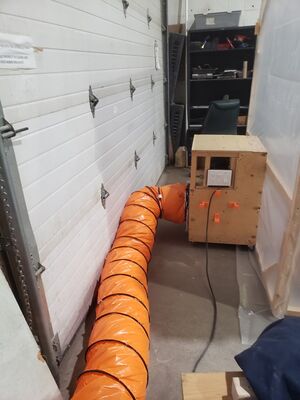
- Note: that we are in the process of making an adaptor to fit the garage door. In the meantime, just open the door a couple of feet and then drag the flex hose out as far as you need to.
- Note that you should put a new filter in the front of the fan unit. The previous user may have plugged the old filter with spry. We will fix this is v3 of the booth.
- Connect the Fan Box electrical power. Use a good extension cord for this.
- Plug any Lights and/or electric spray guns in the power outlet on the Fan Box.
- turn on power switch on the base unit to start the fan. Test the volume of output to ensure that the filter is not too plugged. For reference, you can remove the filter and then manually check the volume of airflow with your hand. You should see the difference that a plugged filter will exhibit.
Storage Instructions:
(These instructions are just the reverse of the deployment instructions.)
Step 1:
- Disconnect all electrical components and the Flex hose.
Step 2:
- Raise all of the 4 corners onto the collapsible caster. This is done by gently lifting the corner and kicking the caster under the corner. The weight should hold it in place.
Step 3:
- Pop the wall spreader bar off the pegs and allow the walls to start to fold inwards. Note that the spreader bar is stored in a couple of hooks above the door on the outside of the front wall.
- Gently roll the booth over to the storage location. Note that you may want to hold off latching the walls tight until it is near or at it's final location. As mentioned, it is very top heavy when fully collapsed, so as a safety measure you may want to let it roll with a wider stance.
Upgrade
V2.0 of the booth has been completed. This includes the following improvements:
- End wall sections that allow them to remain attached to the base unit, as well as collapse for storage. This includes catches to hold the walls in the collapsed position.
- A retractable roof. This is a prototype design using a weighted end to slide the roof down as it is collapsed, and slide up as it is deployed.
- Electrical upgrade to add an electrical switch and outlet for lights.
- Added a 12" flex hose to route the air to the outside. This includes a 3D printed HVAC type adaptor to attach to 12"x12" exhaust from the base unit fan.
- Rubber casters to improve the rolling on concrete. Added castors to the front wall.
it takes a v2.1 upgrades have been completed. This includes the following:
- Added flip-up casters so that the booth can be dropped to the floor, which seals the gap between the walls and the floor.
- plans to improve the attachment of the fan cabinet to the rear wall. This needs to be updated to all for the raising and lowering of the walls.
Proposed additional upgrades:
- Replace Base unit poly with a more resilient fabric dropcloth. I have purchased a 9' by 15' drop for this purpose. All that is needed is to sew up an edge so that it will be resilient.
- construct a floor sweep style air exhaust for porting the air from the booth to the outside. Adapt this to a 48"x3" low profile sweep that the door rests on. There would also be 2 48"x3" door plugs that would allow this to plug the door when deployed. The door is 12 feet wide. Concept drawing is coming
- the floor sweep has been designed in Fusion and a prototype will be built first. Basically a 12" hexagon which lofts to a 48" by 3" floor sweep with 10 facets.
Detailed photos (V1.0)


Detailed photos (V2.0)


Documentation
TBD