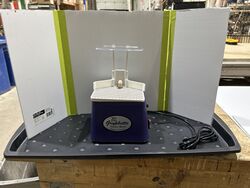
Glass Grinder (Gryphette Diamond Grinder) ID:202
(Redirected from 202)
Jump to navigation
Jump to search
 Stained glass diamond grinder | |
| Type | Glass Grinder |
| Make/Model | Gryphette Diamond Grinder |
| Serial number | N/A |
| Original owner | Jeff Dumba |
| Loan status | Long term loan |
| Arrival date | 2025-02-05 |
| Location | Woodshop |
| Functional status | Functional |
| Usage permissions | Members |
| Certification | Read the manual online |
| Wiki-ID | 202 |
| Label | 1.0" 1.5" 2.0" |
Specs
TBD
Usage
- Place grinder in area with good ventilation and lighting.
- Add water to tray under the work surface.
- A notch is provided to drain excess water. Insure that water tray remains full of water during operation.
- Add water to water tray as required. Grinding without adequate water cooling the bit will drastically shorted the bit life.
- Place sponge in hole provided. Insure that bottom of sponge absorbs water from the tray.
- Insert sponge so that upper part of sponge touches the grinding bit.
- It is very important that the sponge keep the grinding bit wet during operation.
- New sponge strips may be cut from a standard kitchen sponge.
- Press glass, rock or tile to be ground against revolving grinding head with moderate pressure.
- Shape your material with smooth lateral strokes removing a small portion of the unwanted material with each pass.
- Do not apply excessive pressure.
- If you wish to drill a hole, use a grinding pin.
- Gently bring glass into contact with the top of the pin at a 45° angle until the hole is started.
- Rotate the material until it is flat on top of the grinding pin.
- Make sure that water is allowed to reach the contact point by directing water at the bit, or holding a wet sponge against the bit.
- When done, turn off the grinder. Clean grinder between uses. Rinse the sponge regularly.
Troubleshooting
TBD
Documentation
Links
TBD