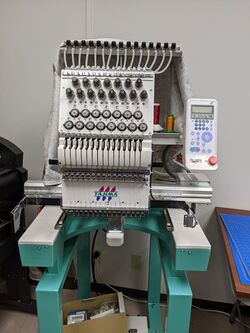
Embroidery machine, CNC (Tajima TEJT II-C NEO 1501) ID:144: Difference between revisions
Jump to navigation
Jump to search
(Quick Start guide added) |
(→Quick Start: warning) |
||
| Line 30: | Line 30: | ||
*Weight 40 thread | *Weight 40 thread | ||
=== Quick Start === | ===Quick Start=== | ||
{{Warning|This "cheat sheet" is not a substitute for proper training and confidence in operating this very nice and expensive machine! If you're feeling unsure, ask for help!}} | |||
# Digitize your file - software magic process steps go here - and copy onto special USB 1.0 stick | #Digitize your file - software magic process steps go here - and copy onto special USB 1.0 stick | ||
# Insert stick into USB port at rear left side of machine | #Insert stick into USB port at rear left side of machine | ||
# Scan card on lockout device to power on Tajima | #Scan card on lockout device to power on Tajima | ||
# Choose your frame type at "Frame:" | #Choose your frame type at "Frame:" | ||
#* flat: the various flat circular green frames | #*flat: the various flat circular green frames | ||
#* cap: the round metal hat torture device | #*cap: the round metal hat torture device | ||
# "Initialize: On" allows the machine to home at calibrate, why would you ever turn this off? | #"Initialize: On" allows the machine to home at calibrate, why would you ever turn this off? | ||
# Load your file from USB stick by pressing the "Data" button and scrolling through the list | #Load your file from USB stick by pressing the "Data" button and scrolling through the list | ||
# "Color change:" | #"Color change:" | ||
#* | #*auto: if you'd like the machine to just run your color order | ||
#* manual: if you need to change fabrics or positions between colors/operations | #*manual: if you need to change fabrics or positions between colors/operations | ||
# | #Type in your color change order - note this is in hexadecimal so 1-9 then 10 is typed using the "+10" button then 0 and shows up as A, so 11 is "+10" then 1 and will show up as B, etc. | ||
# | # | ||
# | |||
==='''Needle Replacement Procedure'''=== | ==='''Needle Replacement Procedure'''=== | ||
Revision as of 00:39, 11 October 2022
 | |
| Type | CNC embroidery machine |
| Make/Model | Tajima TEJT II-C NEO 1501 |
| Serial number | 3127 |
| Original owner | Protospace |
| Loan status | N/A |
| Arrival date | Feb 9th, 2021 |
| Location | Sewing Room |
| Functional status | Waiting for training material |
| Usage permissions | ?? |
| Certification | Course |
| Wiki-ID | 144 |
| Label | 1.0" 1.5" 2.0" |
Documentation
Specs
- Single-head 15-needle
- arm-style
- 19.5” L x 14” D; 32” door clearance
- up to 1,200 stitches per minute
- 170 lb. welded frame
- Cost: $8500.00
- Weight 40 thread
Quick Start
| This "cheat sheet" is not a substitute for proper training and confidence in operating this very nice and expensive machine! If you're feeling unsure, ask for help! |
- Digitize your file - software magic process steps go here - and copy onto special USB 1.0 stick
- Insert stick into USB port at rear left side of machine
- Scan card on lockout device to power on Tajima
- Choose your frame type at "Frame:"
- flat: the various flat circular green frames
- cap: the round metal hat torture device
- "Initialize: On" allows the machine to home at calibrate, why would you ever turn this off?
- Load your file from USB stick by pressing the "Data" button and scrolling through the list
- "Color change:"
- auto: if you'd like the machine to just run your color order
- manual: if you need to change fabrics or positions between colors/operations
- Type in your color change order - note this is in hexadecimal so 1-9 then 10 is typed using the "+10" button then 0 and shows up as A, so 11 is "+10" then 1 and will show up as B, etc.
Needle Replacement Procedure
- Loosen Flathead screw, remove worn or damaged needle
- When installing needle, vertical groove faces user, seat needle fully into holder.
- Ensure vertical groove still aligned before tightening
- Tighten flathead screw
- Rethread the needle
Changing a Spool
- Load on new spool
- Cut old spool.
- Tie end of old thread to new thread. Clip any extra and stray material so it does not get caught when you pull it through
- Pull the old thread from the needle side. The new thread will get pulled through the tubing and tensioners automagically
- Cut new thread and rethread the needle
Rethreading A needle
To cleaning cut a thread, put new thread under NO TENSION and cut at an angle. This makes the thread end a wedge and un-frayed which is far easier to thread through the eye of a needle
Thread needle front to back (away from user), raise thread end up and into spring to hold it there.