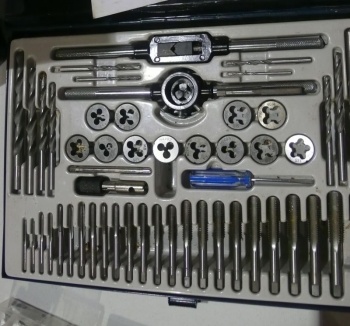
Tap & die set (Mastercraft): Difference between revisions
Jump to navigation
Jump to search
Ian Oliver (talk | contribs) (added categories Category:Metalworking tools and Category:Hand tools) |
m (Updated template names) |
||
| (3 intermediate revisions by one other user not shown) | |||
| Line 1: | Line 1: | ||
{{ | {{Equipment page removed | ||
|removedby=Travis | |||
|removalreason=[https://groups.google.com/d/msg/protospace-discuss/ZVKUVG3B-fY/Ag_xJz9iCgAJ it was getting treated poorly] | |||
|replacements=various low-quality taps and dies | |||
|toolname=Tap & Die Set | |toolname=Tap & Die Set | ||
|model=Mastercraft ?? | |model=Mastercraft ?? | ||
| Line 13: | Line 16: | ||
}} | }} | ||
[[Category:Metalworking tools]] | [[Category:Metalworking tools (removed)]] | ||
[[Category:Hand tools]] | [[Category:Hand tools (removed)]] | ||
==Usage Notes== | ==Usage Notes== | ||
Latest revision as of 15:04, 10 November 2016
| This article is about a tool that is no longer at Protospace. Further information can be found below. |
- Type: Tap & Die Set
- Make/Model: Mastercraft ??
- Serial Number: ??
- Original Owner: Travis
- Removed by: Travis
- Removal Reason: it was getting treated poorly
- Loan Status: Semi-Permanent Loan
- Arrival Date: Pre 2013
- Removal Date: {{{removaldate}}}
- Replacements: various low-quality taps and dies
- Location: Metalworking Shop
- Functional Status: Working
- Usage Permissions: Open to Members & Friends
- Certification: Demo/Usage Notes
- Wiki-ID: [[{{{id}}}]]
Usage Notes
- Taps create threads in holes, to put bolts in
- Dies create threads on bars, to put nuts on
- Taps and Dies are brittle and fragile, do not force them
- For tapping, use lookup table to determine size of hole to drill prior to tapping (will be smaller than bolt size)
- For dies, use lookup table to determine size of the bar to use prior to threading (will be larger than die size)
- For tapping, drill appropriate hole size first with normal metal bit
- Place tap in tap wrench
- Ensure tap is perfectly lined up with hole, angle is committed from start onward and slight offset will start but then break the tap several threads in. NEVER DO THIS.
- Slowly rotate tap to begin cutting threads
- Use appropriate thread cutting lubricant for material, see reference chart
- Every 1/4 rotation of cutting, reverse tap one half rotation to break burr. If forgotten, tap will break. NEVER DO THIS. Tapping is a back-and-forth process
- If tap ever binds or requires a sudden change in force, is lined up incorrectly, possibly all the way from the start. This is unfixable. DO NOT CONTINUE or apply more force, tap will break.
- Ensure full threads are tapped by threading several full turns of the tap past the far side, if applicable.
Specs
- Note - Tap set is in grey plastic, is in a blue case (a separate tap set is grey case with blue plastic).
