Laser Cutter, Thunder Nova 51 ID:178: Difference between revisions
Michael.fiss (talk | contribs) No edit summary |
Craig.pearce (talk | contribs) |
||
| (One intermediate revision by the same user not shown) | |||
| Line 108: | Line 108: | ||
===Setting Focus Height=== | ===Setting Focus Height=== | ||
[[File:Thunder-Laser-Focus.jpeg]]<br /> | [[File:Thunder-Laser-Focus.jpeg]]<br /> | ||
[[File:Setting focal distance.png|thumb|Using measurement tool to set 10mm focal distance.]] | |||
Note: If using the 4" laser head, the focus distance is 10mm. See page 52 of the [https://www.thunderlaser.ca/wp-content/uploads/down/Nova_Series_Unified_User's_Manual.pdf Thunder Nova User Manual] for assistance setting focus distance. As noted in the user manual, the focal distance isn't as important for 4" laser head and can be anywhere between 10mm-12mm. | |||
=== How to use the different nozzles laser head cone === | === How to use the different nozzles laser head cone === | ||
| Line 117: | Line 122: | ||
A nozzle has a very narrow outlet (approx. 2mm), which provides high air flow to blow directly on the cutting gap. This nozzle is excellently suited for cutting wood, as this prevents soot formation in the cutting gap. The other nozzle has a large outlet (approx. 6 mm), which provides the air assist to blow the material more slowly and not directly on the cutting gap. This nozzle is excellently suited for cutting acrylic, as this prevents white mark in the cutting edge. Besides, when engraving wood, for example, particles that have been removed and smoke / gases are gently distributed and extracted in the working area. So you get a clean, almost unaffected by smoke traces engraving. | A nozzle has a very narrow outlet (approx. 2mm), which provides high air flow to blow directly on the cutting gap. This nozzle is excellently suited for cutting wood, as this prevents soot formation in the cutting gap. The other nozzle has a large outlet (approx. 6 mm), which provides the air assist to blow the material more slowly and not directly on the cutting gap. This nozzle is excellently suited for cutting acrylic, as this prevents white mark in the cutting edge. Besides, when engraving wood, for example, particles that have been removed and smoke / gases are gently distributed and extracted in the working area. So you get a clean, almost unaffected by smoke traces engraving. | ||
=== How to install 4" laser head === | |||
''Excerpt from Thunder Nova User Manual series page 49'' | |||
# Move the table down until there is space to remove the 2" laser head and install the 4" laser head. | |||
# Take out the air hose. | |||
# Loose the thumb screw and remove the 2" laser head. | |||
# Install the 4" laser head and insert as far as it will go. | |||
# Reattach the the air hose. | |||
Note: Automatic focusing ''cannot'' be used with the 4" laser head! | |||
=== How to use air-assist control === | === How to use air-assist control === | ||
| Line 145: | Line 162: | ||
*[https://thunderlaser.com/laser-cutter-settings-for-different-materials/ Laser Cutter Settings For Different Materials | Thunder Laser] (note: ensure you select 130W from the top menu) | *[https://thunderlaser.com/laser-cutter-settings-for-different-materials/ Laser Cutter Settings For Different Materials | Thunder Laser] (note: ensure you select 130W from the top menu) | ||
=== Adjusting the Jog Speed === | |||
Moving the laser head around using the physical arrow buttons on the controller is referred to as jogging. To increase or decrease the jog speed, press the `Speed` button on the laser controller. In the menu that appears on screen, use the arrow buttons to increase or decrease the mm/sec value. Please note that you need to select and adjust each digit. For example, if the jog speed is set to 49mm/sec and you decrease the 9 digit, it will not cycle down to 39mm/sec after 40. You must move your cursor to the tens position and increase/decrease the 4. See the Nova [https://thunderlaser.co.uk/wp-content/uploads/2018/12/User-manual-NOVA51.pdf#page=43 instruction manual] for more info. | |||
==Troubleshooting== | ==Troubleshooting== | ||
Latest revision as of 02:17, 2 November 2024
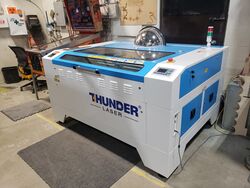 | |
| Type | Thunder Nova 51 Laser |
| Make/Model | Nova 51 |
| Serial number | ? |
| Original owner | ProtoSpace |
| Loan status | Owned |
| Arrival date | Tuesday March 5, 2024 |
| Location | Bay 108 by the pinball machine |
| Functional status | Operational |
| Usage permissions | ? |
| Certification | Laser I Course |
| Wiki-ID | 178 |
| Label | 1.0" 1.5" 2.0" |
Specs
| Working Area | NOVA 51 |
|---|---|
| Working Area | 51.2"x 35.4"
(1300 x 900 mm) |
| Table Size | 55.1"x 40.6ª
(1400 x 1030mm) |
| Z Axis Height | 8.9" / 225 mm |
| Max Work height | 8.9" / 225 mm |
| Max Speed | RASTER: 39"/sec. (1000 mm/sec) VECTOR: Varies with job |
| Motor | Easy Servo Motor |
| Drive | Hybrid Servo Drive |
| Work Piece table | Solid metal blades & Honey comb table |
| Max table load | 30kg / 66lbs |
| Net weight | 430kgs / 946lbs |
| Available heads | 2.0" (50.8mm) |
| Lens diameter | 20mm |
| Mirror Diameter | 25mm |
| Beam Comb, dia, | 25mm |
| Door Closed | 55.1“x 40.6“x 8.9 “
(1400 x 1030 x 225mm) |
| Pass thru | 55.1“ x ∞“ x 1.2“
(1400 x ∞mm x 20 mm) |
| Laser type | 130W Sealed CO2 Glass Laser Tube |
| Wave length | 10.6um |
| Power consumption | 2200W |
| Recommended
circuit breaker |
25A,110V
15A,220V |
| Laser class | CDRH Laser Safety
Laser Class 2 CE compliant FDA approved |
| Accessory's | N/A |
Usage
Using the Auto-Focus Feature
Calibrating the Auto-Focus
Setting Focus Height
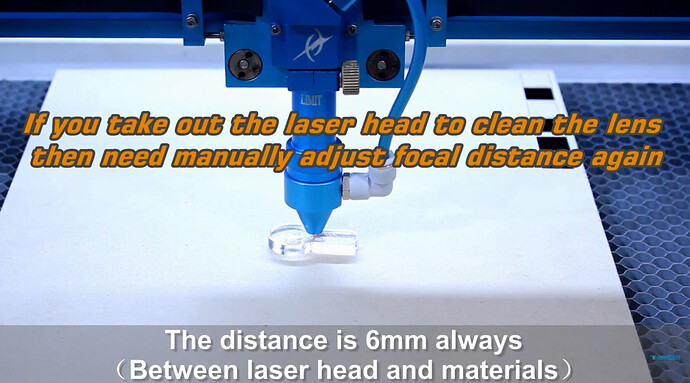
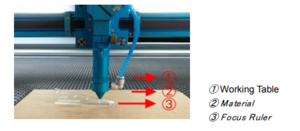
Note: If using the 4" laser head, the focus distance is 10mm. See page 52 of the Thunder Nova User Manual for assistance setting focus distance. As noted in the user manual, the focal distance isn't as important for 4" laser head and can be anywhere between 10mm-12mm.
How to use the different nozzles laser head cone
Excerpt from thunder manual Nova series page 48
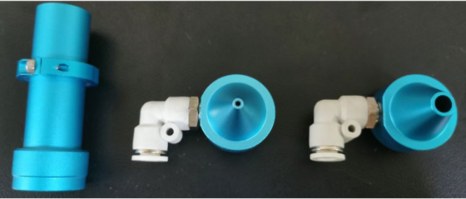
The standard laser head is equipped with a 2 "(50.8mm) focusing lens and focuses the laser beam to a diameter of about 0.14mm (when using a glass laser tube). With this laser head, you can perform fine engraving work (such as letters with 1.5mm height) and cut materials up to 10mm thickness with good quality (depending on the laser power of the machine). The standard laser head is supplied with 2 air nozzles laser head cone.
A nozzle has a very narrow outlet (approx. 2mm), which provides high air flow to blow directly on the cutting gap. This nozzle is excellently suited for cutting wood, as this prevents soot formation in the cutting gap. The other nozzle has a large outlet (approx. 6 mm), which provides the air assist to blow the material more slowly and not directly on the cutting gap. This nozzle is excellently suited for cutting acrylic, as this prevents white mark in the cutting edge. Besides, when engraving wood, for example, particles that have been removed and smoke / gases are gently distributed and extracted in the working area. So you get a clean, almost unaffected by smoke traces engraving.
How to install 4" laser head
Excerpt from Thunder Nova User Manual series page 49
- Move the table down until there is space to remove the 2" laser head and install the 4" laser head.
- Take out the air hose.
- Loose the thumb screw and remove the 2" laser head.
- Install the 4" laser head and insert as far as it will go.
- Reattach the the air hose.
Note: Automatic focusing cannot be used with the 4" laser head!
How to use air-assist control
Excerpt from thunder manual Nova series page 56-57
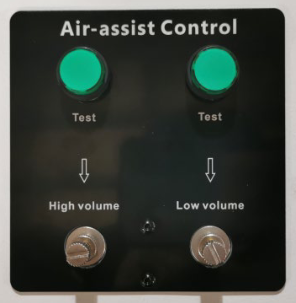
On the Thunder laser, the "low volume" air is always blowing on the part when the laser is active, unless the operator requests even more air by enabling "air assist" in Lightburn, which will tell the Thunder to use "high volume" air instead.
Generally, cutting needs the air assist with high air-volume but engraving needs the air assist with low air-volume.
Selecting Between Low and High Dual Air Assist Stages In LightBurn
Adjusting Air Volume
1. Make sure machine is not at work and laser switch is off
2. Click the green "Test" button to start the air-assist. (It will automatically turn off after a short period of time)
3. Check the air volume under the laser head
4. On the control valve, loose the locked nut then rotate the adjusting screw to control the air volume to meet your requirements. Note that the dials are reversed from what you might expect. Clockwise (further in) is less air. Counter-clockwise (further out) is more air.
5. Fix the lock nut after finished.
How To Adjust The Dual Stage Air Assist
Suggested Material Settings
- Laser Cutter Settings For Different Materials | Thunder Laser (note: ensure you select 130W from the top menu)
Adjusting the Jog Speed
Moving the laser head around using the physical arrow buttons on the controller is referred to as jogging. To increase or decrease the jog speed, press the `Speed` button on the laser controller. In the menu that appears on screen, use the arrow buttons to increase or decrease the mm/sec value. Please note that you need to select and adjust each digit. For example, if the jog speed is set to 49mm/sec and you decrease the 9 digit, it will not cycle down to 39mm/sec after 40. You must move your cursor to the tens position and increase/decrease the 4. See the Nova instruction manual for more info.
Troubleshooting
Indicate light
- If laser machine is running a job or user starts it without closing door or water protection, the signal lamp is in red light. The red light indicates the dangerous situation and user must stay with the laser.
- If laser machine is not at work, the signal lamp is in green light. The green light indicates the safety situation and the laser machine is ready for operation.
- If temperature is higher than 55°C/131°F on working table, the signal lamp will make buzzing sound.(roughly 80dBA within 1m,75dBA within 5m and 65dBA within 10m,the sound gets weaker as it travels).
Chiller
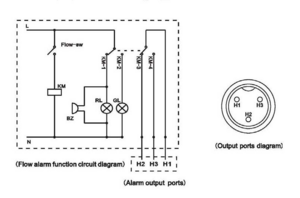
The chiller alarm status connected to the Thunder laser. But it isn't really "interlocked" as it only sends a problem signal if there is a power interruption or an active alarm.
The chiller sends a "normal operation" signal on pin H1 and H2 if it is on and working properly, but the Thunder only listens to pin H1 and H3 for the "problem" signal. [1]
The Thunder simply assumes the chiller is operating normally unless it is told otherwise. If any part of the alarm signal path is disconnected or broken, the Thunder will not be aware of problems with the chiller.[2]
Maintenance
Thunder Laser Preventative Maintenance Checklist
Documentation
- Official User Manual: Nova_Series_Unified_User's_Manual.pdf (thunderlaser.ca)
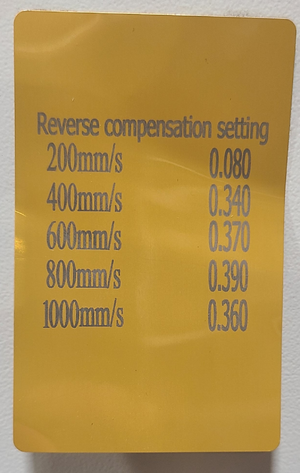
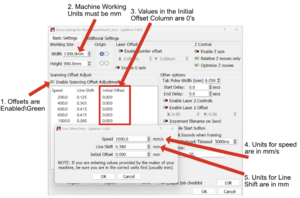
Offset Settings
| Speed (mm/s) | Line Shift (mm) | Initial Offset |
|---|---|---|
| 200 | 0.080 | 0 |
| 400 | 0.340 | 0 |
| 600 | 0.370 | 0 |
| 800 | 0.390 | 0 |
| 1000 | 0.360 | 0 |
