Skiving Machine, Bell Knife, (Techsew SK-4) ID:184: Difference between revisions
Jump to navigation
Jump to search
Jamie.frost (talk | contribs) (Adding instrucitons) |
Jamie.frost (talk | contribs) mNo edit summary |
||
| Line 1: | Line 1: | ||
{{Equipment page | {{Equipment page | ||
| toolname = Leather Skiving Machine | | toolname = Leather Skiving Machine | ||
| model = SK-4 | | model = Techsew SK-4 | ||
| serial = tbd | | serial = tbd | ||
| owner = Protospace | | owner = Protospace | ||
| Line 88: | Line 88: | ||
==Documentation== | ==Documentation== | ||
PDF [https://drive.google.com/file/d/16zViLVLn-Zy4LuUyPlU2fda_ldxdc8Rq/view?usp=drive_link User Manual] (Google Drive) | |||
[[Category:Sewing]] | [[Category:Sewing]] | ||
[[Category:Textileworking tools]] | [[Category:Textileworking tools]] | ||
Revision as of 10:33, 30 June 2024
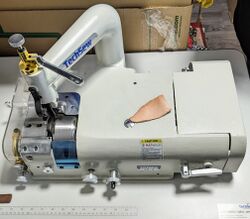
 Industrial leather skiving machine top front view | |
| Type | Leather Skiving Machine |
| Make/Model | Techsew SK-4 |
| Serial number | tbd |
| Original owner | Protospace |
| Loan status | Owned |
| Arrival date | June 2024 |
| Location | Soft goods |
| Functional status | Operational |
| Usage permissions | Trained users only |
| Certification | Skiving machine training |
| Wiki-ID | 184 |
| Label | 1.0" 1.5" 2.0" |
Specs
Manufacturer claims:
- Skives light and medium leather up to 8oz
- Up to 2" adjustable skiving width
- Integrated blade sharpener
- Space saving table - only 33.5" wide
- Variable speed 550W 1200 RPM servo motor
Usage
| ⚠ |
|
|---|
Startup
Inspect, lubricate, clean, adjust/change accessories
Operation
- Adjust depth stop to desired skiving width.
- Raise clear cover and ensure drive wheel preload spring is hooked to drive wheel carriage. (Stowed when not in use). Lower clear cover.
- Adjust drive wheel as close as possible to bell knife edge without touching. Drive wheel can be raised/lowered, and angled fore/aft until equal gap exists.
- Lower presser foot lever, ensuring foot does not contact drive wheel.
- Raise presser height with adjustment wheel to make enough room for leather thickness.
- Power on machine with foot clear of pedal and hands clear of all moving parts.
- Operate foot pedal until blade/drive wheel moves slowly - Inspect/listen for any maladjustment:
- Any grinding/metal-metal contact indicates maladjustment - Stop Immediately.
- Check drive wheel clearance/presser foot height for interference. Ensure sharpening stone is disengaged and retracted
- If interference was with blade edge, sharpen blade.
- Keep hands clear of blade intake area at all times.
- Insert leather between foot and drive wheel, butted up against depth stop.
- Adjust presser height while running at low speed until foot barely pushes leather into drive wheel.
- Let the machine do the work. If it isn't feeding, readjust instead of pushing the leather.
- Keeping hands clear of blade intake area: Guide leather under foot, gradually increasing in speed as comfort level increases.
Sharpening blade
- Remove all material
- Wear safety glasses and engage safety squints. Keep clear blade cover closed*
- On occasion, sharpening stone will need to be dressed for roundness, requiring the cover to be opened. Caution, everything in there is sharp, or pinchy/grabby. See user manual for specifics.
- Visually inspect through clear cover that the blue grinding wheel is not touching the bell knife.
- Engage sharpening stone drive lever (far right) - pulse motor and visually confirm grinding wheel is spinning and not touching the bell knife.
- Run motor at medium-high speed while slowly advancing wheel into knife until they make gentle contact. Less is more.
- Once grinder makes contact with bell knife continue grinding for a short time (few seconds) until edge is honed. Do not overheat blade.
- Retract grinding wheel (few rotations of adjustment knob).
- Disengage sharpening stone drive lever (far right)
- Non-Profit.
Shutdown
- Power off motor - depress pedal to drain residual charge.
- Raise presser foot lever. Never leave presser foot down while not in use.
- If you need to clean the bell knife or drive wheel, disengage drive wheel carriage spring (under clear cover)
- Using a brush or chopstick - not metal - NOT YOUR FLESHY FLESH HANDS - clear remnants from bell knife.
- Use compressed air to clear debris from machine and work surface.
- Close lid, sweep up, cover machine.
Troubleshooting
Skived area uneven thickness: Drive wheel angle wrong, adjust to be even along entire length of wheel
Does not skive - just cuts leather - Drive wheel too low, raise drive wheel
Skives poorly/jagged/uneven feeding - Too much/too little pressure foot pressure, or blade dull. Sharpen blade, adjust foot.
Top of leather damaged by presser foot - Presser foot too low, wrong angle. Adjust for less pressure, check angle is equidistant along drive wheel
Documentation
PDF User Manual (Google Drive)