VCarve-Makerspace-Client-instructions: Difference between revisions
Chris.pinter (talk | contribs) |
Chris.pinter (talk | contribs) |
||
| Line 45: | Line 45: | ||
===Working with a 2D Image=== | ===Working with a 2D Image=== | ||
To setup a 2D image you will need a Bitmap file.</br> | |||
The basic steps are to do the following:</br> | |||
1. Create a new file,</br> | |||
2. setup you material dimensions </br> | |||
3. import the bitmap</br> | |||
</br> | |||
I found this video which explains the process in detail.</br> | |||
</br> | |||
https://www.youtube.com/watch?v=sv9vbmvexJc | |||
===Working with a 3D model=== | ===Working with a 3D model=== | ||
Revision as of 22:27, 23 August 2023
Protospace VCarve pro Makerspace Client Installation instructions
Protospace has purchased a license for a Makerspace version of VCarve Pro Edition.
This license includes allowing a user to run a VCarve Pro Client at home and then bring in the files to Protospace to output G-CODE and submit to the CNC machines.
Note that this installation will allow you to use all functions of VCarve PRO Edition on your PC but it will not export G-CODE.
You must bring this files to a workstation licensed to Protospace and export the G-CODE from there.
The following instructions show you how to install VCarve PRO Edition on your PC, then get licensed as a Client for Protospace.
Procedure:
Step 1) - Download the trial version of VCarve: https://www.vectric.com/support/makerspace-sign-up and Install it on your PC
Note: The latest version of VCarve Pro is 11.5 but they do not have a Makerspace version released so we need to use VCarve Pro version 11.0. The link above will link to VCarve Pro 11.0 trial to download.
Step 2) - Launch the program and skip through the licensing questions and simply get it installed with a basic 3-axis mill (the default Mill)
Step 3) - License the software using the Protospace Makerspace Client License.
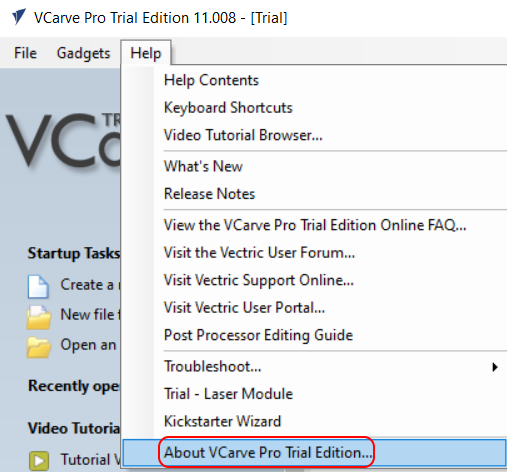
- Goto Help => About VCarve Pro Trial Edition...
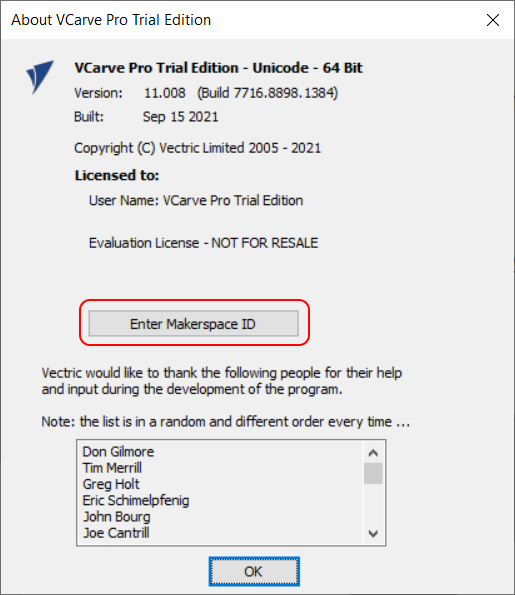
- Select the Enter Makerspace ID button.
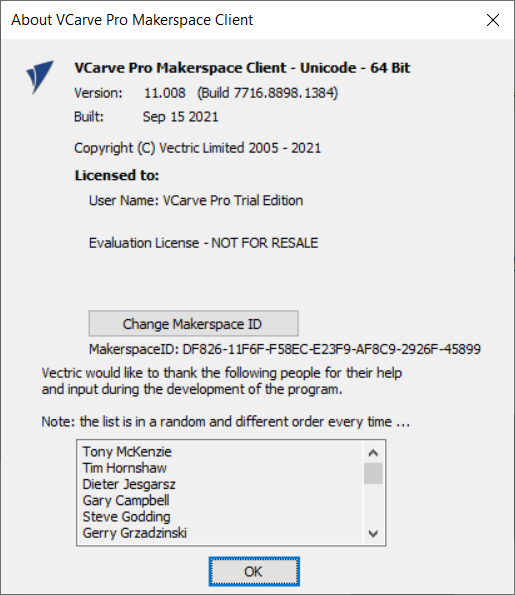
- Enter Protospace unique code DF826-11F6F-F58EC-E23F9-AF8C9-2926F-45899
- Congratulations! You are now ready to run VCarve PRO version on your PC/workstation.
- After the modelling/designing is done, transfer this file to Protospace main workstation (upstairs) to finalize your project.
Creating files
Working with a 2D Image
To setup a 2D image you will need a Bitmap file.
The basic steps are to do the following:
1. Create a new file,
2. setup you material dimensions
3. import the bitmap
I found this video which explains the process in detail.
https://www.youtube.com/watch?v=sv9vbmvexJc
Working with a 3D model
If you have an stl file and want to import it into VCarve you will need to do the following:
1. Open a new file
2. setup your material dimensions
3. import the STL file. File -> import -> import component 3d model
4. scale and center the model onto your material.
5. Use the 3dModel tools to create the toolpaths.
There is a video I followed that explains all of these steps.
https://www.youtube.com/watch?v=X94lQ8_Um1Y


