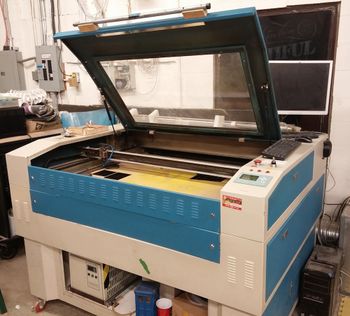
Laser cutter, large (Rabbit Laser RL-80-1290) ID:6
| This article is about a tool that is no longer at Protospace. Further information can be found below. |
- Type: Laser Cutter
- Make/Model: Rabbit Laser USA RL-80-1290 (where RL is the factory code, 80 is the original laser power in watts, and 1290 represents the bed size (1200 x 900 mm))
- Serial Number: ??
- Original Owner: Brian Queen
- Removed by: {{{removedby}}}
- Removal Reason: {{{removalreason}}}
- Loan Status: Semi-Permanent Loan
- Arrival Date: 2012-02
- Removal Date: April 2024
- Replacements: Thunder_Nova_51_Laser_ID:178
- Location: Bay 108, near the door to the front rooms
- Functional Status: Sold
- Usage Permissions: Members & Friends Only
- Certification: Must complete Laser Certification
- Wiki-ID: 6
Arguably the most popular tool at Protospace, the laser cutter uses a CO2 laser to cut and engrave a variety of non-metal materials (though some metals can be engraved).
Software
| Controller recently upgraded! Stay tuned for changes to this page, workflow, training materials, etc. |
With the recent controller upgrade, this tool now uses LightBurn V1.4.00 which can be downloaded and purchased here: https://lightburnsoftware.com/pages/trial-version-try-before-you-buy
Protospace obtained a two-seat license, which is currently installed on the Rabbit computer and the upstairs classroom computer for training/demo/design purposes.
If members wish to purchase LightBurn for their own use, as a makerspace we qualify for a 75% off coupon. To receive the coupon code please contact one of the laser trainers or email laser [at] protospace.ca.
Logging onto the Rabbit computer and starting LightBurn for the first time, follow these steps to load the machine configuration:
1) On the Intro screen that pops up, hit OK
2) Next will appear the Devices box, just click Cancel
3) "Device setup required" - click No on this box, and LightBurn will close
4) Restart LightBurn - it should come up in dark mode, and near the bottom of the right pane, there should now be a "Rabbit" device!
If for some reason this doesn't work, the machine/device/software configuration files are saved on the P:\ shared drive, or reach out to laser@ / forum / trainers.
While LaserCut is still present on the machine, it will not "do anything" with the laser and remains for posterity in old case settings are needed or some poor users have .FTP files to work on. More historical LaserCut information can be found in the edit history of this page.
Resources
The Powerpoint presentation that is shown as part of the laser certification process, useful as a refresher once you've completed your certification.
TemplateMaker, a very useful Online tool for generating various custom boxes and shapes that can be cut on the laser.
Wolfie's SVG Puzzle Generator, exports a randomly generated puzzle in SVG format which can be converted to DXF and then laser cut out of something (in order to make personalized puzzles).
MakerCase, generates a proper box with the option to set the thickness of the material and pick which style of joints to use.
Approved Materials
Plastic
ABS (acrylonitrile butadiene styrene) — Smells really bad when cut
Acrylic (also known as Plexiglas, Lucite, PMMA)
Delrin (POM, acetal)
Kapton tape (Polyimide)
Mylar (polyester)
Nylon — melts badly
PETG (polyethylene terephthalate glycol)
Polyethylene (PE) — melts badly
Polypropylene (PP) — melts somewhat
Styrene
Two-tone acrylic — top color different than core material, usually for custom instrumentation panels, signs, and plaques.
Foam
Depron foam — often used for RC planes.
EPM
Foam core — foam core gets burned and eaten away compared to the top and bottom hard shell.
Styrene and other hard foams — very large kerf and taper when cut
Other:
Cloths (leather, suede, felt, hemp, cotton)
Magnetic sheets — usually poor results
Papers — all paper products
Teflon (PTFE, Polytetrafluoroethylene)
Woods (MDF, balsa, birch, poplar, red oak, cherry, holly, etc.)
Glass — can engrave glass, but not cut it.
Pancakes — requires multiple passes - does not smell delicious
| It is imperative that you do a chlorine test on unapproved materials before working on them with the laser cutter. |
Specs
- 80-watt DC-excited carbon dioxide laser tube
- Water-cooled, with chiller accessible from the front
- Bed size: 1200 mm × 900 mm (47.2" × 35.4")
- Front panel of machine can be removed or folded down to insert pieces longer than 3' (though this can risk dangerous laser radiation exiting the machine, so be careful)
- Controller: Ruida RDC6442S - very well supported, large community of Chinese laser / K40 / LightBurn users, ask Google and ye shall receive!
- Can cut or etch up to 1/4" (6 mm)-thick light materials such as woods and some plastics in one pass, or thicker materials in multiple passes
- Cut kerf is approximately 0.3 mm (full width); you should measure it with your material if it's important to your project
| Do not cut any chlorinated synthetics (some types of plastics and rubbers)! The HCl vapors will damage the machine. |
Lens
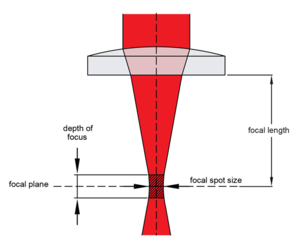
What we have been using: a coated ZnSe Meniscus Lens, 20 mm diameter, 50.8 mm focal length from II-VI Infrared 724-352-1504 via AliExpress
https://www.aliexpress.com/item/32928303093.html
https://www.aliexpress.com/item/32234326702.html
etc.
Coating CX/AR(LP) side 1, CC/AR(LP) side 2, coated @ 10.6 µm
Mirrors
Cloudray 20 mm diameter Si Mirror via Amazon
Usage Notes
- Complete Laser Certification to learn how to use the laser. Training is offered about once a month.
- Perform a simple chlorine test on unapproved materials, as cutting or etching chlorinated materials damages the optics
- Consult our Laser Standard Operating Procedure
Troubleshooting
"Logon method is not allowed on this computer" when trying to sign in to the computer with your Protospace username and password
Your account is not authorized/enabled to use this machine, have you taken the training? Did you pay for, attend on time and pass/participate in the training? Were you vetted at the time that you took your training? Did the instructor mark you as Attended? Please verify your training records on Spaceport and check in on the forums to update your account.
"Soft stop" when trying to test outline of job
Check the job origin on the lasercut software. Button on the top that says “set stop position” (red square with blue arrow). Open dialog box and de-select 'Fixed Pos'. Then use cursor to select a new start position on display.
Then manually move the laser head to the approximate position of your new start position using the arrows on the machine.
Jobs always start in the top left 0,0 of bed, instead of where the laser is
Machine local origin is set; use the arrow keys until the job name is highlighted and press enter, press the right arrow key to select "Clear logical origin" and press enter again
When tracking the contour (using the 'test' button) the laser pauses and restarts while moving in Y-axis direction
Similar to the above issue, the local original is set. Use the arrow keys until the job name is highlighted and press enter, press the right arrow key to select "Clear logical origin" and press enter again. Re-test your job and it should function normally.
Jobs appear to be positioned at absolute coordinates specified in LaserCut, instead of relative to where the laser head is
"Immediate mode" checkbox is enabled
Arrow keys on keypad don't move laser head
Press the Z-axis button to exit Z-axis up/down mode and/or try mashing ESC
Laser head only moves a little bit each time an arrow key is pressed
Press menu, find jog set, make it 0.
PAUSED PRESS START TO CONTINUE
If the laser cutter keeps displaying this message when you start your job, it means the limit switch that detects if the lid is closed is not being engaged. The lid limit switch is located rear left side of the machine. Make sure the switch is engaged and restart. Better yet, reposition the switch so it is always depressed when the lid is closed.
DXF files are distorted when imported
Select/highlight the entire file in Lasercut, click Ctrl-Z - what does this do?
LaserCut software assumes 1 unit of your DXF file is 1mm. Best practice is to export your drawing from CAD to DXF in millimeters. Other units (px, inches, au, etc.) are ignored. Instead of re-exporting, you can right-click on your drawing, choose "Scale" and multiply the dimensions by 25.4 to go from inches to millimeters - is this correct? Try adding a 1 inch by 1 inch square box to your CAD drawing. Once DXF is imported to LaserCut, right-click on the box's line and choose "Scale", to 25.4mm by 25.4mm.
Rabbit hangs on Startup Screen
If the lid is open when starting the Rabbit, it sometimes won't come out of the startup screen. Close the lid and try turning the laser off and on again. If that doesn't work, check to make sure the lid is engaging the switch when closed (the switch is in the back left side of the opening, on the body of the Rabbit).
Maintenance
Every Use
- Check water level in chiller
- Remove offcuts and scrap from the bottom
Monthly
- Position gantry is in back left and bed is lowered.
- ENSURE POWER IS OFF BEFORE MAINTENANCE.
Remove bed. Update: Bed has been clamped to the frame using C-clamps and a Note posted next to the laser indicating that the bed has been leveled to within 1 mm and to not disturb it.- In all cleaning steps, do not spray any cleaners inside the laser. Spray onto cloth or paper towel outside of laser.
- Clean inner and outer surfaces of laser cutter including window.
- Use dilute Zep Fast 505 industrial degreaser or other cleaner on hard surfaces (Zep Fast 505 typically stored on shelf beside stairs to classroom with other cleaning products.)
- Use windex on window.
- Gently wipe dust off the CO2 in back compartment.
- Avoid contaminating linear rails or optics (Do not use Zep Fast 505 on linear rails!)
- Wipe linear rails clean with solvent degreaser (brake cleaner - brake cleaner specifically because it is volatile and will evaporate out pretty fast, so it has 0% change of contaminating the bearings. General purpose degreasers may stick around on the railings and contaminate the bearings and compromise the lubricant) Do not move gantry or bearings onto cleaned section of rail until all solvent has evaporated to prevent contamination of bearing grease.
- Power on or move gantry manually to front right. Repeat steps to clean surfaces and linear rails.Power off again if turned on.
- Grease three linear bearings (left Y, right Y, X) using grease located in the right side compartment storage. Remove set screw, pack in grease with syringe or finger, replace set screw, wipe off excess grease.
- DO NOT USE ANY AEROSOL OR SPRAY LUBRICANT
- Currently using Permatec Ultra Slick multipurpose synthetic grease.
- Remove and clean lens. Do not lose o-ring. Check direction of the lens (replace convex (Hill) side UP (away from the workpiece) and flat/concave (valley) side toward work)
- Check condition of optics clean if necessary (again, ensure power is off.) Watch this helpful video if you have no clue how to do this
- Clean lens at the head of the laser tube
- Clean mirrors with q-tips and lens cleaning solution if available (use isopropyl alcohol if not)
- If cleaning the optics, PROCEED TO ALIGNMENT
- Before checking beam alignment, put on eye protection as checking beam alignment requires us to fire the laser while the lid is open.
- Placing tape or targets on each mirror, moving the mirror to nearest position of the previous mirror.
- Fire the laser at the nearest position. Move the mirror the farthest position and fire again. Compare where the burn marks are - if they are at the same spot, the mirror is aligned along the gantry. If there are two burn spots, the mirror must be aligned.
- Adjust the mirror alignment
- To adjust beam alignment, adjust the mirror orientation by turning the thumbscrews on the mounting plate. Turn only a small amount and re-fire the laser to get a sense of how sensitive the mirror adjustments are.
- The thumbscrews on the rabbit mirrors are in a different location than this video but the principles of alignment still apply. The thumbscrews change the yaw and pitch of the mirror. For the current mirror mounts, it is easiest to adjust the yaw (or X) position of the beam first then correct the pitch (or Y) position.
- Check the beam alignment of each mirror at the nearest and farthest extent that the gantry will allow. This will ensure the beam is aligned along the entire travel pathway of the mirror.
- To reset Z height on laser head - Move Z axis bed to top. Put down piece of paper. Adjust laser head to just touch top focus on focus gauge
- To adjust beam alignment, adjust the mirror orientation by turning the thumbscrews on the mounting plate. Turn only a small amount and re-fire the laser to get a sense of how sensitive the mirror adjustments are.
Replace bed. Check it is level. Adjust if necessary. See Note above. The bed cannot be removed without disturbing the leveling.- Check tension on all belts. Adjust if necessary.
- Inspect electronic components for operation including six limit switches (±X, ±Y, ±Z axis), lights and light wiring, electronics cooling fan
- Blow out dust from chiller radiator.
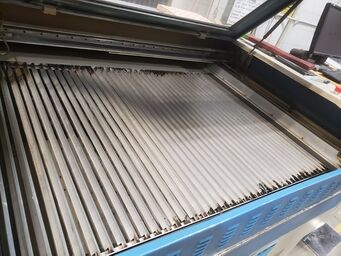
Here is a picture of the Bed after a cleaning:
As Required
- Inspect Z-bed screws for smooth operation. Clean and regrease if required. Z screws must be thoroughly cleaned with solvent degreaser before re-applying clean grease.
- Replace worn or failed laser optics including mirror or lens. Check alignment after any optics replacement.
- Thoroughly clean smoke and residue off internal surfaces of laser cutter
- Use concentrated Zep Fast 505 industrial degreaser
- Avoid contaminating linear rails or optics
To Do List
Bed is warped. X max side of the bed projects up.
Air tube hits the X-max limit switch on right side. Adjust it so it doesn't. Better yet, tee up a replacement for this tube at the current one is crusty and still.
Refill + maintain a list of consumables for this tool:
- gloves
- syringes for greasing bearings
- multipurpose synthetic grease
- q-tips
- isoproyl alsocol
- brake cleaner
- Laser cut alignment targets out of cardstock
Size the set screws for Y and X axis bearings
Make up cleaning pack and put it in the bottom compartment of the rabbit
Benchmarks
The following settings should cut a 1"x1" square on 3 mm Baltic birch:
2022-07-16
Preclean BACK LEFT side of bed: 100% power, 18 mm/s
Preclean FRONT RIGHT side of bed: 100% power, 15 mm/s
Post clean BACK LEFT side of bed: 100% power, 40 mm/s
Post clean FRONT RIGHT side of bed: 100% power, 30 mm/s
2022-05-22
Preclean FRONT RIGHT side of bed: 100% power, 20 mm/s
Preclean BACK LEFT side of bed: 100% power, 25 mm/s
Post clean FRONT RIGHT side of bed: 100% power, 25 mm/s
Post clean BACK LEFT side of bed: 100% power, 35 mm/s
2022-04-10
Post Clean FRONT RIGHT side of bed: 100% power, 35 mm/s
Post Clean BACK LEFT side of bed: 100% power, 50 mm/s
History
- 2012-02 - On loan for 6 months (ending 2012-08) in exchange for Protospace performing repairs
- Loan has been extended
- 2016-11-06: Chiller failure. Laser tube destroyed (overheated and glass cracked)
- 2016-11-07: Laser tube replaced with an aging, but unused tube that was donated from a scrap laser
- 2016-11-11: Chiller failure. Laser tube destroyed.
- 2016-11-13: Two new laser tubes ordered from an American source.
- 2016-11-24: Laser tube replaced, chiller pump is broken.
- 2016-12-04: Chiller repaired. Alignment and power testing is pending.
- 2016-12-18: Laser is fully operational.
- 2019-08-17: Lens failure. [1]
- 2019-08-17: New lens ordered.
- 2019-08-21: Lens replaced, laser is working.
- 2022-02-06
- Tumblers from locks removed from front panel. They can now be turned by hand, making it easier to remove and replace the front panel during cleaning and servicing.
- 2023-06-01
- Controller upgrade - Leetro removed, Ruida RDC6442S installed
- Software upgrade - LightBurn v1.4.0 purchased and installed, machine/device/software configured, a 'user default' process somewhat put into place
- Door switch replaced and relocated - the back left corner had a weird voltage drop across the wire, and the switch itself was very crusty. This setup didn't work reliably with the Ruida, so to ensure safe operation a new switch was wired and installed in the back right corner of the lid.


